Have firefox? Subscribe!

Did you know that if you are using Firefox you can subscribe to this blog and have posts listed in a bar at the top of your browser? I think it works with other browsers too! Click here to subscribe.

Thursday, February 14, 2008

Success!

When I got into class this morning, it was just like Christmas unwrapping the tape from the binding to see how it turned out, and I was very happy. There are virtually no gaps in the top binding, which my instructor said doesn't happen very often with wood binding. With some confidence in what I was doing, I got the back binding installed before lunch. The back binding is a little more difficult, due to the curvature or the back and the fact that you have 2 butt joints which are both visible that have to line up with the center line perfectly. The top is much easier in that respect as it only has one butt joint at the tailblock and the binding is covered up by the neck/body joint at the dovetail and does not come together because of the dovetail mortise. Around 2:00 this afternoon, I removed the tape from the back and was pleasantly surprised to see that the back binding turned out even better than the top, and I have been in a good mood all day since. Starting to scrape the binding flush is very rewarding because everything looks so dirty when you take the tape off, but scraping really cleans it up and makes it look nice.

Here is a shot of the bound box:
There is still plenty of scraping to do.

I also started on the end graft today and should finish it on tuesday. I got the 4 miters cut in the side purfling(next to the binding) and got one of the end graft pieces of purfling mitered and cut. I'll just have to fit the 2nd piece of purfling and the cocobolo piece that is going in the middle on tuesday and it is going to look awesome.

Here's what the end graft looks like so far:

I did get my neck rough cut on Tuesday and the fretboard slotted yesterday, so next week will be all sorts of fun stuff like cutting the neck angle, routing the dovetail tenon, carving the heel, fitting the neck, radiusing the fretboard, cutting the taper, gluing the fretboard, and maybe some work on the headstock and neck shaping...

I should be doing some actual cool stuff in electric tomorrow, so I will try to take some pictures and blog again this weekend.

Wednesday, February 13, 2008

Even more on binding.

We didn't have a lecture this morning, so I was able to get right to it with the binding first thing in the morning. The first order of business was to select the proper router bearings for the size of binding and purfling that I'm using and make some test cuts. After everything was set up for my purfling to fit correctly, I had to set up my guitar in the binding cradle and make sure that the top edge was even with the table to ensure accurate cuts.

One of the dilemmas that luthiers had previously come across when routing binding is that when you use a regular router with a bearing, the binding channels are not straight up and down due to the slight curvature in the top and back. To correct this, Tom Ribbecke, a well known guitar maker, designed the Universal binding machine. This device holds the router upright and the guitar is passed underneath it to get a straight binding channel route. Using this machine, the binding routing went smoothly, quickly, and easily. It was a lot less stressful than I thought it would be.

Here is what the binding machine looks like. I've decided that I must get one of these when I'm building on my own:

The only actually time consuming part in routing for the binding is that you have to readjust the cradle for routing the back and once the purfling channel is cut, the bearing needs to be changed and the depth adjusted, again making test cuts to ensure a good fit for the binding. After the routing was done, I marked out my end graft location and routed out a slot for that.

After routing the end graft, I took my bent pieces of binding out of the mold and discovered that the side purfling had come off of most of them. This was kind of a bummer, but doesn't really matter because the purfling pieces still bent the way I wanted them too and that is the important part. It was just a little difficult when installing the binding and purfling because they are all glued in together, so I had 3 pieces to contend with instead of 1 or 2 which most people had. Why does Cocobolo have to be so oily? After a session of chisel sharpening and a little trimming, I got the top binding and purfling completely in. It'll be on to the back binding/purfling and and graft installation tomorrow, which I'm a bit nervous about as I plan on mitering the purfling that runs up and down the end graft to meet the side purfling at about a 45 degree angle. If done right, it is going to look awesome!

Here is the binding clamped in place with one of the most high tech tools I used today, tape:
And the binding and purfling out of the mold and ready to be installed in the back:
I can't wait to take the tape off of the top tomorrow and see how it turned out!

Monday, February 11, 2008

A bit on binding.

Well, it didn't seem like I got as much done as I wanted to today, but what can I say it was a monday... We had a fairly long lecture today on binding, as binding is one of the things that really differentiates a fine guitar from a mediocre guitar. I'm not going to go into all the specifics of it right now, but needless to say there is a lot more to just routing the channel and gluing it in.

I did get my back glued on and flush routed today, as well as getting my binding prepared. The binding that I'm using is cocobolo with b/w/b side purfling and b/w/b top and back purfling as well. When doing side purfling, it needs to be glued to the binding, so it can be bent with the binding and because of the structure of it, the side purfling would not bend by itself. To attach the side purfling to the binding, the two pieces are wrapped together with thread, and then thin super glue is wicked into the joint between the two. Then, they are thickness sanded to a consistent thickness and ready to be bent. I had to do some cleanup work of the binding/purfling pieces before bending, so they did not get bent today, but will be first thing tomorrow. I will also start the neck construction tomorrow, and will probably post another update on wednesday. In the meantime, here are some photos for you all.

Gluing the back on using the same method used for the top:

Here is a shot of the box all together and ready for the binding routes:I'm really excited to see how this is going to look finished. You can't see the mottled flame in it all that well right now, but it will really pop on the back and sides with some finish.

Here is a shot of the binding pieces all ready to be bent:
Yes, there are 5 pieces there. I made one extra just in case there are any bending issues.

Thursday, February 7, 2008

Holy expletive deleted it's starting to look like a guitar!

It has been a great week. I've made a lot of progress on the acoustic, I'm finally starting to get a sense that the archtop may get completed, I didn't injure myself, and I'm keeping my fingers crossed that we will have electricity for electric construction tomorrow.

After gluing the blocks on, I glued in the side braces and then the kerfing. The side braces are just thin strips of mahogany that run from top to back inside the sides to prevent and stop cracks from happening in the sides. There was a small amount of math involved in figuring out the spacing, but it really wasn't difficult. The only tricky part is keeping them from slipping and sliding while gluing because tight bond isn't immediately tacky and has to set up a bit before the wood actually sticks. After the side braces were on, I had to dry clamp the kerfing over them to determine where to notch the kerfing so it could go over them. A little sandpaper on a ruler did the trick to notch out the kerfing and it was ready to glue to the ribs. This is fairly simple to do, but not necessarily easy to get the kerfing to glue to the sides gap free. All the process involves is tight bond on the kerfing and about a hundred clothes pins to clamp it to the sides.

Here is the kerfing clamped up with around 100 clothespins clamping it in place:

Once the kerfing was glued in, the ribs and kerfing had to be sanded down to fit the radius of the top and back. The top stays fairly flat, so it was sanded with a radiused sanding block, but the back has a greater radius and was sanded in a radius dish with a big piece of adhesive sandpaper. It took a while to sand the back because I left my blocks a little too tall, but it got done.

Here is the whole rib structure with kerfing, side braces, and sanded:

After sanding, the sides and kerfing had to be notched for the top braces because they are left long to go through the sides and kerfing and flush-trimmed later and covered up with binding. The notching was a little nerve-wracking. The sides were placed over the top with the braces up and the locations of the braces were then marked on the sides. After that, the depth of the notches was cut with a sunchild saw and the wood was removed with chisels. It is crucial that the slots are not too deep, so care must be taken to get each notch to a perfect depth. Width is not quite as important, but as always, accuracy is key.

After ensuring each brace fit well in the notches, as well as making sure the top was still lined up on the center line of the mold, blocks, and ribs, it was time to dry clamp the top. The top and back gluing/clamping method we use is pretty cool. It involves a bunch of screws sticking out of the workboard and 45 feet or so of bungee cord being wrapped around the screws and over the top or back. This gets pretty even clamping pressure to the top and kerfing glue joint and seems to work pretty well. After examining the dry clamping and making sure it is gap-free, glue is applied and the bungee is wrapped up again and left for about two hours.

Here is the top being glued and clamped in place with bungee cord:
And here is Chris's back being glued:
Chris is also using the Tazmanian Blackwood back and sides, but making an OM body, which is smaller than a dreadnought, so it should be interesting to compare how his guitar and mine sound side by side. The very thought excites me quite a bit.

While my top was clamped up, I took some time to voice my back and final shape and smooth the back braces. Here is the back after that was done:
After a few hours, the bungee cord was removed and I did some cleaning up inside the box to make everything look pretty, even though the majority of people who see this guitar will not bother to look, nor will they care. Guitar makers are perfectionists. Glue squeeze out must be eradicated. I tried my darndest, and I think it looks pretty nice.

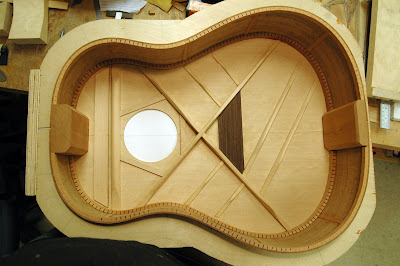
Here is the inside of the box with the top glued on:
After the clean-up, I routed the notches for the back braces needed to glue the back on. This was very easy to do and took far less time then the hand cutting of the top braces because I used a pre-made template and the back just snaps into place. It's pretty slick. Then, the dovetail was routed in and the back is ready for gluing first thing on Monday. Isn't it exciting?

Here are a couple of pictures of the top flush trimmed to the sides and the dovetail routed:

In archtop news, I'm finally starting to feel like I'm making progress. I finally got my back arch carved and it is ready for scraping. The top final arching should take considerably less time, and then I can scrape both plates and start rough graduations, which is the arching of the inside of the plates that brings the arches to desired thicknesses. I will post more on this soon.

Possible blog on the electric progress this weekend...

Saturday, February 2, 2008

Lots of holdups this week, but moving forward none the less.

What an interesting week it has been for me. Pretty much every week has been interesting since I moved to Red Wing, but this week was particularly bizarre. Weeks like this make me really feel like this winter is out to get me, but I won't let it get me down for too long. I've got 3 guitars to finish before the school year is over, and the only thing that will make that happen is persistence.

Wednesday was an ok day in acoustic construction, but there are things I would have liked to have gone better. I did get my top voiced first thing in the morning, and I was surprised at how easy it was to do. Hopefully, the voicing process will lead to a well balanced dreadnought with not too much bass. It should be really interesting to hear how it sounds with the black acacia back and sides, because I've never heard a black acacia dreadnought before, let alone a koa dreadnought. The second half of the day, I got my second side bent and clamped in the mold over night, and I also made a feeble attempt at back joining. The flame in the back was giving me some difficulties, and I tried a couple of different jointer planes, different places on the blade, and I even freshly honed a plane blade, all with no luck. It was around 4:00 when I started to get quite frustrated and jammed my right hand pointer finger into the plane blade. Enter gushing blood. Grrr. I went back to the sink, rinsed it off, and applied some pressure trying to get the bleeding to stop. It seemed like it wasn't going to stop, but it did eventually. My instructor wanted me to go into urgent care as a precaution because the cut went through my fingernail about an eighth of an inch, but the doctor told me I didn't really need to come in and that my finger would heal just fine on it's own. I also kind of figured as much, but I guess better safe than sorry.

Thursday was a relatively productive day in both acoustic and archtop. I finally got my back joined, thicknessed, and the outline cut out. I also trimmed off the excess from the sides, prepped the blocks, and glued the blocks to the ribs. Near the end of the class, I got my back braces prepared for gluing and glued the back center support strip in the go-bar deck so the back will be ready for bracing on monday. Hopefully on to box assembly and neck construction next week!

Archtop is coming along. I'm still working on the final arch shaping of my back, and every class period brings it closer to done. Hopefully, I'll be scraping the back and working on the final arching of the top next week. Once the final arching and scraping is done, it will be on to graduations! Apparently the graduations are pretty simple on guitars, and all the process involves is drilling a bunch of holes of different depths in different areas on the back of the plates and gouging/planing down to the depths of the holes until they are gone, then checking and fine tuning with a dial caliper. The arching, however, is much more in the dark since I have never done this before and am not exactly sure what the final product is supposed to look like. It's starting to make more sense to me, and the arching templates really help, but it also seems like what my instructors tell me to do is contrary to what the arching templates are telling me. There's also the whole issue of the recurve throwing things off a bit with the templates as well. I'm sure it will start to make sense soon.

Electric construction yesterday was kind of sad. I made some good progress on finishing up my templates in the 2 hours of the day after a 2 hour lecture from 8-10. I would have probably finished my templates yesterday, but the power went out in my apartment over lunch and what do you know, it was also out at school. Apparently, Excel was saying it could be up to 4 hours, so my instructor decided to cancel class. Boo. More lost lab time. More hindered progress. Time to kick things into overdrive...

More photos coming next week!

Tuesday, January 29, 2008

Snow day lutherie.

So I just found out about an hour and a half ago that all classes today were canceled starting at 1. I stayed until 12:45, trying to get my back joined, but the jointer plane and I were just not getting along. So here I am, with nothing better to do than write a blog, but that's not such a bad thing.

This week has been going fairly well so far. I got my bridge plate and x-brace cap glued in yesterday and while I was waiting for those to dry, I got one side bent, but didn't have time to bend the second. I was planning on bending the second today, but my plans were hindered by the cancellation of class. I got a start on the final brace shaping yesterday, and spent a good portion of time today doing the final pre-voicing shaping and I am now pretty happy with how they look. But considering archtop is canceled tonight, I don't have much else for you, except for some photos.

Here is the top with the braces final shaped pre-voicing. The scallops in the lower bout halves of the x-braces and the lower transverse braces will probably be taken down a bit during voicing tomorrow.

And here is the one bent side clamped in to the mold. The other should be bent tomorrow.
And this is what I'm doing with my day since I can't work on guitars:
I'm pretty excited to get my top voiced tomorrow...

Wednesday, January 23, 2008

Finger planes don't like my fingers very much.

So i've been doing quite a bit of work with finger planes since Tuesday and I've determined that they don't design them to be very finger-friendly. Tuesday night in archtop, I started the second to the last step in the arching process. This involves using finger planes to fine shape the arch. This is all fine and dandy for the folks making mandolins or violins, but it's kind of rough on us guitar makers. Perhaps I was a little too vigorous in my planing due to the fact that I was pretty tired and maybe feeling a little bit behind, but I have a few nice nicks in my hand and a nice big blister on my thumb that looks like a tumor. Ugh. I now associate finger planes with pain. I'm sure I'll get over it eventually. I think I am going to bring some gloves to archtop tonight, because it will definitely be more of the same. Fun stuff. On the brighter side of things, the back is starting to look like an archtop should. Still quite a bit of work to do, but tonight should be fruitful.

Acoustic construction is moving right along, with a few hiccups here and there... Tuesday morning, I finally got the abalone in the rosette sanded flush and it looks really nice. After that was done, I cut the soundhole out and sanded out the inside of the top to prepare for bracing. Then, the outline was re-drawn on the inside of the top and the bracing locations were marked out and drawn on using a bracing template. I had already cut and thicknessed my brace stock before the weekend, so I just had to radius the brace pieces on a handy jig using the edge sander and cut them to length and plane to height. Yesterday, I got my x-brace notched and glued that up with the upper transverse brace in the go-bar deck, waited for the glue to dry, and got the x-braces shaped before class was over. Today, I got all of my other brace stock ready to be glued and will be doing that in about an hour or so. The only thing left after that will be final shaping of all braces, gluing the bridge plate in, and voicing the top. I also hope to get my sides thicknessed and tapered so they are ready for bending on Monday. Good stuff.

Here's a pretty low quality cell phone picture of the rosette after scraping, but before sanding to level the abalone. It looks a lot nicer than the picture does justice...

And a shot of the x-brace shaping in progress:

Well, I've only got 8 and a half hours of class left today and electric construction tomorrow. Hopefully I'll get all the templates done tomorrow and begin working some wood. I'm pretty excited to see how the electric is going to turn out. It should be pretty awesome.

Wednesday, January 16, 2008

Top joining, rosettes, molds, and other fun stuff

Well this has been a good week so far, and I've gotten quite a bit done so far in acoustic construction. To sum things up so far, I've gotten the mold and workboard done, made clamping cauls, joined and thicknessed the top, and made some good progress on the rosette.

Last week, I got all my pieces of plywood glued together using dowels to line them up and they were ready for routing on Monday. Routing is a fairly mindless task because there is a bearing on the bit that glides over the template, or in this case the plywood sandwich that has already been routed, and everything gets nice and even and pretty close to perfect. Once routed, I traced outside the routed outline an inch and a half and cut off the excess with the bandsaw, leaving a flat section at the waist for future clamping. Then, I screwed a piece of plywood on at the top where the bandsaw cuts on the individual pieces were made and the mold is done!

This is what it looks like:

With the workboard pieces glued together, all that was left was to smooth out the edges a bit with various sanders and run it through the drum sander to flatten it.

On Monday, I also got my top joined. This was exciting because it was the first thing that will actually become part of the guitar that we've worked on. Top joining is a fairly straight-forward process. First, you set up a shooting board with a jointer plane(a really long flat plane) on it's side. Then you run the guitar top wood across the top of the board/along the bottom of the plane. This gets the edge nice and straight. You do this for both boards, and put the edges together with a lightbox underneath them and when no light can be seen, the joint is good and ready to be glued. Fire up the hot hide glue, clamp it up and glue it in the gluing deck and you now have a guitar top.

Yesterday, I spent a good portion of the day listening to lectures, getting my top to thickness, and making some clamping cauls, which will hold the ribs into the mold. The cauls are shaped to the body outline, but the curves of the cauls actually have a 3/32" smaller radius than the mold to take into account rib thickness. To make a long story short, it takes a good deal of touch up sanding to get them shaped just right.

Here is a picture of the cauls in the mold, but they still need a bit of work:

Today was a fun day. First off, we had a nice 2 hour lecture about rosettes, including various types of rosettes, how to make them, and how to inlay them in a guitar top. I made a rosette bending mold out of plywood because I thought I was going to have to soak and bend my purfling strips, but they came kind of bent already, so I at least got some good practice routing. Now on to the second waste of time today, which was a little mishap with the top. Everything was all set to go, including having the outline traced on the top, the soundhole distance from the edge marked and drawn, and having the rosette drawn. The last thing to do before actually routing the rosette is to drill out a hole for a pin to guide the router for routing the rosette and cutting the soundhole. I took my time making sure the hole would be nice and centered, used an awl and the drill bit with my hand first, but somehow I still managed to drill the hole 1/16" off of center. Grrrr.... That means it was time to cut an 1/8" long sliver of 3/16" dowel and plug the hole to re-drill a new one. I made a bracewood cut list while waiting for the glue in the plug to set up and the day was over. Tomorrow should be a better day.

Here's a picture of the top with the abalone that is going to be inlaid in it and you can also see the plugged hole:

The rosette is also going to have a total of 6 strips of black/white/black purfling with 2 strips in the innermost ring, 1 strip on each side of the abalone in the center ring, and 2 strips in the outermost ring. This will be one classy looking rosette! I'll hopefully have pictures of it inlaid tomorrow.

Thursday, January 10, 2008

We're not messin' around.

Well, two days into acoustic construction class and I'm loving it. So much to do, so little time, and it couldn't be any better. Yesterday consisted of making some plexiglass templates for the neck and half body. It's surprisingly easy to work with plexiglass, much more than I imagined it would be. It cuts super easy with the bandsaw and takes to a rasp and files just as easy as wood and easier than aluminum. You do want to make sure to bandsaw them as close as possible to the outline to eliminate as much work as possible, but it still takes a while to get them perfect.

Today was even more interesting because we started making our molds and workboards. The workboards are pretty simple because it's essentially two pieces of 3/4" plywood glued on top of each other and cut to shape with a bunch of screws in the side, but we'll get to the why on that one later. The molds are not quite as simple as the workboards, but still not too bad. Essentially, you glue pieces of plywood together 2*2, bandsaw the excess of the guitar shape out of the middle, clamp a routing template for the guitar outline on top of the stack and route the outline in the mold pieces using a flush cutting bit with the bearing riding on the template. Then you glue the stacks together, screw a piece of wood in to hold the mold together at the top where you entered with the bandsaw, and then cut off the excess from the outside part of the mold. I think the most difficult part is finding something to do while the glue dries... On to top joining on Monday!

Tonight in archtop, I spot-glued my plates to the rib structure, which is super cool because it almost looks like a guitar for a brief moment. Unfortunately, this step is only temporary to drill holes for the locating pins which will be used when finally gluing on the top and back. It does look cool though, but there's still lots of arching to be done...

So I have a pageview tracker thingy on here and I am proud to say that people other than my friends and family are reading this blog. Cool, huh? I've had views from Australia, Hong Kong, Michigan, California, and of course MN. Even cooler is that the referring site is from google! I wonder how that happened...

Electric construction starts tomorrow! I think I've decided I want to do a CBS era headstock. It's different than the modern strat headstock and it looks pretty cool. This is what they kinda look like:

I know, I know, it's not a CBS but I couldn't find a good picture of just the headstock anywhere else on the web so this will have to do. I think the CBS's had a slightly more dramatic swoop down at the lower point closest to the nut, but I'm not sure. Now i just have to figure out nut width, taper, scale length, etc... Fun stuff.


That's all I got. Until next time I remain the Not So Lugubrious Luthier...

Tuesday, January 8, 2008

It's time to hit the ground running...

Yep, tomorrow at 8 AM it begins. Second semester will start and it's time for a full force guitarmaking frenzy. I'm excited again. Break was a rather sedentary experience for me, but I did get some things figured out and had a good time with many friends. I will say that I didn't accomplish nearly as much as I would have liked to over the past 2 weeks, but it really seemed to fly by at the same time. It was a good recharging time, so I feel ready to get working again.

I bought my mold and template wood yesterday, so I should be ready to roll. I just need to find some cork and bungee cord for the workboard and I should be pretty much set. I have quite a few boxes of guitar parts/lumber to bring to Red Wing, so I'm not really looking forward to unloading them at school tomorrow morning. It should be interesting, to say the least.

Well, it's nearly time for me to hit the road... Expect more posts soon on the construction of the 3 guitars.