I know it's been a while since my last post, but I've been a busy guy, looking for jobs and working and living and stuff. It also doesn't help that I have no internet at home and have to go to the library to get online. That will soon change, as I am starting a job at Qwest on Monday and will have a nice discount on some DSL service, not to mention a decent paycheck finally... I worked at guitar center for about a month from august-september, but it was a pretty horrible job and I basically got paid slightly more than minimum wage to unpack and set up merchandise on their sales floor. I got a job valeting at the country club that my girlfriend works at and I really enjoy doing that, but I don't have enough hours there. Life is good otherwise.
I've gotten one guitar repair job so far, making a saddle for a classical guitar and doing some more extensive work on a 1970s japanese made dreadnought that was in rough shape. The fingerboard was in horrible shape, so I did some repairs to that, including a refret. Being bound, it was a bit difficult, but the frets are now in and it's ready for leveling and dressing. It also really needed a neck reset, but it wasn't worth the effort so I decided to plug the drop in saddle slot, shave the bridge, and re-route and make a new saddle. I'm in the process of finishing that and I will also be making a new nut once the frets are dressed and the work on the bridge is done. I really should stop dragging my feet on this one, but this guitar has been giving me nothing but problems which are to be expected on a guitar of such low quality. Has anyone ever heard of Terada guitars? I really only agreed to do the work because the guitar has sentimental value to the owner and I can imagine it might actually sound pretty decent if I can get it playing decent. I'll post some before and after photos when it's done.
I've also been approached with a couple of possible commissions. The first is for a banjo for my good friend Steve, which would be some pretty straight forward lutherie, except for figuring out how to turn the rim. Most resources I've consulted highly recommend using a metalworking lathe, but those run around $2000 at least, money I don't really have for a one time project. I'm sure I'll figure something out. The second commission is for an OM style acoustic guitar for my friend Adam's wife. I'm really excited about getting this going and getting back into guitarmaking. It will give me motivation to move all my power tools out of my parents basement and start using them to make some guitars. Good things are on the horizon!
I hope to continue posting more here soon, as I am now up to over 2000 visitors to this blog and it is very cool to receive comments from interested readers from all over.
Friday, October 17, 2008
Wednesday, July 23, 2008
They're done!! (Well 2 of them anyways...)
I can't believe it's been almost three months since my last post! Things have been interesting since I finished school. I got a job assisting a mason that I worked through the month of June, but I wasn't quite built for the job and the guy I was working for was kind of a jerk so he let me go and didn't even pay me what he owed me. A lot has happened since then and I've been focusing on my job search lately, which I'm hoping will end soon. If anybody knows of any lutherie or woodworking jobs available around the Minneapolis/St Paul area, let me know. I've got one interview tomorrow and it is the first in my three weeks of job searching, but I do what I can... Enough about my life, and on to the guitars!!!
The Southeast Tech guitar show was on May 8th, and it was a great but stressful day. I had a couple of hours after gluing the bridge the day before to get the nut and saddle made, tuners installed, and bridge pin holes drilled, reamed, and slotted. To make a long story short, I got my guitar strung up about a half hour before the show and life was good. My parents also came down for the show, and I felt bad because I was too busy finishing the setup that I couldn't really show them around. The show went disaster free for everybody, and despite the fact that a couple of my fellow students had some bridges that were starting to come unglued, no bridges popped off of guitars. Although dreadnoughts are usually flatpicked, I decided to have Phil Heywood fingerpick my guitar in the show and it sounded great!
This is me describing my guitar:

And Phil Heywood playing it:
My dad holding my guitar with me in the background: I was exhausted...
My guitar in it's case on display at the show:
During the last two weeks in may, I took an advanced finishing course and put a lovely dyed red finish on my electric guitar. This course was pretty cool, and we learned about some other types of finishes commonly used in the industry like CAB Urethane and Polyester, as well as doing some really cool metal flake project boards, which I think I may end up making guitar shaped clocks out of... I'm fairly happy with how the finish turned out on the electric, but I'm wishing i would have paid more attention when sanding it because you can definitely see some sanding scratches under the lacquer. They aren't noticeable from more than a foot or so away and even so you have to look pretty carefully to notice. The thing is that I know that they're there and so I always see them. Grrr... I was also able to get my dreadnought buffed out and set up properly, and it now looks and plays beautiful in addition to sounding beautiful.
A nice shot of the body showing off the bearclaw in the top:
The end graft:

Back and sides:
And my bridge design:
It took me a couple of weeks to even start mounting hardware and a few more weeks to start wiring. I accidentally broke the plunger switch on the preamp when i was test fitting it before finishing the guitar, but LR Baggs sent me a new one free of charge and very promptly, so kudos to their customer service. It was kind of tough to get the old switch off of it, but once I finally did, it only took about 30 seconds to solder the new one in. A couple of Saturdays ago, I spent a solid 2 hours or so wiring the whole thing up and mounting the spring claw for the tremolo. Last weekend, I finally did a fret job, made a nut, installed the spring trees and tuner screws, installed the straplocks, and did a fairly thorough set up.
I must say that I am quite happy with how everything came together with the gold hardware, cocobolo fingerboard, red finish, and the flame on the neck. It all looks classy, even the diamonds on the fingerboard, which were a cover-up for a mistake. I also love how it sounds. I didn't have any radioshack .022 mfd capacitors, so I ordered a few of the Sprague Orange Drops off of ebay and installed one in the tone circuit. I'm not sure how much of an audible difference it makes, but it sure beats the .047 mfd that I had installed in the tone circuit temporarily. I love this guitar and have been playing it quite a bit more than the SG since I finished it. I was going for a tone similar to The Black Keys, and the hot golds paired with my Hot Rod Deluxe comes pretty close. Enough rambling about it, you wanna see pictures!
A couple of shots of the front and back of the headstock and neck:

 And a couple of the body with all the lovely gold hardware:


And the front and back of the guitar as a whole:
 Oops, the holes in the tremolo cavity cover don't quite line up with the string holes in the tremolo block, so I guess I'll have to take it off to re-string. Grrr... I guess it's something to make sure I get right the next time.
Fraternal twins!

Part of the reason it took me so long to get assembled and set up is that I didn't have a good place to work, and I was just getting frustrated with working on the kitchen table, having to clear it off for dinner, and not being able to have my tools organized in any way. It turns out that my new house in Golden Valley just so happened to have a bench in the basement that just had a bunch of junk that nobody ever used on it. A few hours cleaning and organizing, and I now have a great place to work on guitars, complete with magnetic racks for chisels! It even came with a bench dog!
Here's a photo of my new workspace:
 Bubba likes to lay on the cool basement floor underneath the bench while I work:
 There's an empty room next to this bench and I'm hoping I may be able to fill it with power tools soon and start making some more guitars and finish the archtop eventually as well. I'll keep you posted...
Until next time.
The Southeast Tech guitar show was on May 8th, and it was a great but stressful day. I had a couple of hours after gluing the bridge the day before to get the nut and saddle made, tuners installed, and bridge pin holes drilled, reamed, and slotted. To make a long story short, I got my guitar strung up about a half hour before the show and life was good. My parents also came down for the show, and I felt bad because I was too busy finishing the setup that I couldn't really show them around. The show went disaster free for everybody, and despite the fact that a couple of my fellow students had some bridges that were starting to come unglued, no bridges popped off of guitars. Although dreadnoughts are usually flatpicked, I decided to have Phil Heywood fingerpick my guitar in the show and it sounded great!
This is me describing my guitar:

And Phil Heywood playing it:

My dad holding my guitar with me in the background:
 I was exhausted...
My guitar in it's case on display at the show:

During the last two weeks in may, I took an advanced finishing course and put a lovely dyed red finish on my electric guitar. This course was pretty cool, and we learned about some other types of finishes commonly used in the industry like CAB Urethane and Polyester, as well as doing some really cool metal flake project boards, which I think I may end up making guitar shaped clocks out of... I'm fairly happy with how the finish turned out on the electric, but I'm wishing i would have paid more attention when sanding it because you can definitely see some sanding scratches under the lacquer. They aren't noticeable from more than a foot or so away and even so you have to look pretty carefully to notice. The thing is that I know that they're there and so I always see them. Grrr... I was also able to get my dreadnought buffed out and set up properly, and it now looks and plays beautiful in addition to sounding beautiful.
A nice shot of the body showing off the bearclaw in the top:

The end graft:

Back and sides:

And my bridge design:

It took me a couple of weeks to even start mounting hardware and a few more weeks to start wiring. I accidentally broke the plunger switch on the preamp when i was test fitting it before finishing the guitar, but LR Baggs sent me a new one free of charge and very promptly, so kudos to their customer service. It was kind of tough to get the old switch off of it, but once I finally did, it only took about 30 seconds to solder the new one in. A couple of Saturdays ago, I spent a solid 2 hours or so wiring the whole thing up and mounting the spring claw for the tremolo. Last weekend, I finally did a fret job, made a nut, installed the spring trees and tuner screws, installed the straplocks, and did a fairly thorough set up.
I must say that I am quite happy with how everything came together with the gold hardware, cocobolo fingerboard, red finish, and the flame on the neck. It all looks classy, even the diamonds on the fingerboard, which were a cover-up for a mistake. I also love how it sounds. I didn't have any radioshack .022 mfd capacitors, so I ordered a few of the Sprague Orange Drops off of ebay and installed one in the tone circuit. I'm not sure how much of an audible difference it makes, but it sure beats the .047 mfd that I had installed in the tone circuit temporarily. I love this guitar and have been playing it quite a bit more than the SG since I finished it. I was going for a tone similar to The Black Keys, and the hot golds paired with my Hot Rod Deluxe comes pretty close. Enough rambling about it, you wanna see pictures!
A couple of shots of the front and back of the headstock and neck:

 And a couple of the body with all the lovely gold hardware:

And the front and back of the guitar as a whole:

 Oops, the holes in the tremolo cavity cover don't quite line up with the string holes in the tremolo block, so I guess I'll have to take it off to re-string. Grrr... I guess it's something to make sure I get right the next time.
Fraternal twins!

Part of the reason it took me so long to get assembled and set up is that I didn't have a good place to work, and I was just getting frustrated with working on the kitchen table, having to clear it off for dinner, and not being able to have my tools organized in any way. It turns out that my new house in Golden Valley just so happened to have a bench in the basement that just had a bunch of junk that nobody ever used on it. A few hours cleaning and organizing, and I now have a great place to work on guitars, complete with magnetic racks for chisels! It even came with a bench dog!
Here's a photo of my new workspace:
 Bubba likes to lay on the cool basement floor underneath the bench while I work:
 There's an empty room next to this bench and I'm hoping I may be able to fill it with power tools soon and start making some more guitars and finish the archtop eventually as well. I'll keep you posted...
Until next time.
Saturday, May 3, 2008
It's shiny!
This last week has been one of the most stressful of the year, and I'm quite relieved that it's over, although next week will be no cakewalk either. Here's a brief rundown of what I've been up to:
Tuesday and Wednesday were spent sanding the acoustic and preparing for finishing, Thursday I sprayed a sealer coat, did some touchup, and applied grain filler.
Yesterday I put a couple final touches on the electric so it is now ready to be sanded for finishing. These include rounding over the body, sanding epoxy off the fretboard inlays, fine tuning the radius of the fingerboard, and installing frets.
Last night, I was up until about 2 am sanding the grain filler off of the acoustic so I could start spraying lacquer on today. I didn't quite finishing the grain fill sanding last night, so I spent a couple of hours this morning finishing that chore. Once that was done, I had to record some top thicknesses and sprayed a sealer coat before lunch. After lunch, I got 4 coats of lacquer sprayed and even got in some good work on my archtop neck as well as gluing the archtop back to the ribs. I may have it done for the advanced finishing class that I'm taking in the last 2 weeks of May so I can put a pretty sunburst on it! I'm stoked about everything.
Below are some photos of how the acoustic is sprayed.
First, I spray the front, back and edges of the headstock:


 ...then I spray the sides:
 ...then the back and top:


 ...and then another coat on the sides since they are harder to spray and the finish doesn't seem to build up on them as easily:
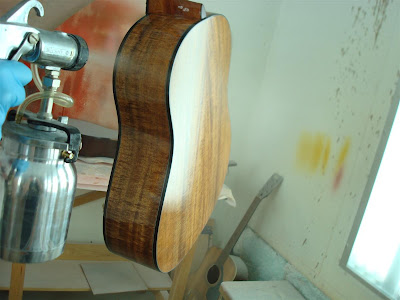 ...and lastly I hang up the guitar and spray the neck:

Oops, I sprayed a little too heavily on the headcap and developed some runs. It's alright though because this will be leveled out later:

And a few shots of the nice, wet, shiny guitar hanging in the booth to dry:

This is the current progress on the archtop:
 I just need to get those blasted braces fit to the inside of the top, and the box will be together and ready for routing the binding channel.
Here are a couple of shots of the electric progress: I think the diamonds turned out quite nicely and look awesome with the gold fretwire. Unfortunately I'm not sure where my camera battery charger is, so I used Alex's camera to take these, so I apologize for them being out of focus.
 This guitar looks better in person. I just have a couple of burn marks from routing the roundover in the body that need to be sanded out, as well as finishing the roundover taper on the back and arm contour transitions. This thing will be done soon!
Tuesday and Wednesday were spent sanding the acoustic and preparing for finishing, Thursday I sprayed a sealer coat, did some touchup, and applied grain filler.
Yesterday I put a couple final touches on the electric so it is now ready to be sanded for finishing. These include rounding over the body, sanding epoxy off the fretboard inlays, fine tuning the radius of the fingerboard, and installing frets.
Last night, I was up until about 2 am sanding the grain filler off of the acoustic so I could start spraying lacquer on today. I didn't quite finishing the grain fill sanding last night, so I spent a couple of hours this morning finishing that chore. Once that was done, I had to record some top thicknesses and sprayed a sealer coat before lunch. After lunch, I got 4 coats of lacquer sprayed and even got in some good work on my archtop neck as well as gluing the archtop back to the ribs. I may have it done for the advanced finishing class that I'm taking in the last 2 weeks of May so I can put a pretty sunburst on it! I'm stoked about everything.
Below are some photos of how the acoustic is sprayed.
First, I spray the front, back and edges of the headstock:


 ...then I spray the sides:
 ...then the back and top:

 ...and then another coat on the sides since they are harder to spray and the finish doesn't seem to build up on them as easily:
 ...and lastly I hang up the guitar and spray the neck:
Oops, I sprayed a little too heavily on the headcap and developed some runs. It's alright though because this will be leveled out later:

And a few shots of the nice, wet, shiny guitar hanging in the booth to dry:


This is the current progress on the archtop:
 I just need to get those blasted braces fit to the inside of the top, and the box will be together and ready for routing the binding channel.
Here are a couple of shots of the electric progress:
 I think the diamonds turned out quite nicely and look awesome with the gold fretwire. Unfortunately I'm not sure where my camera battery charger is, so I used Alex's camera to take these, so I apologize for them being out of focus.
  This guitar looks better in person. I just have a couple of burn marks from routing the roundover in the body that need to be sanded out, as well as finishing the roundover taper on the back and arm contour transitions. This thing will be done soon!
Thursday, May 1, 2008
Umm... diamonds and sanity.
Tell me people am I going insane???
Well I guess I'm not, but I sure as heck am stressed out. After a couple of days of sanding, the acoustic is finally ready to start being sprayed! I was hoping to get the sealer coat on today so I could grain fill the first thing tomorrow morning, but that didn't happen. The good news is that there's no more sanding! This leaves me with the following needing to get done at the specified times: Spray sealer and apply grain filler tomorrow, sand grain filler friday night and maybe saturday morning, spray another sealer coat and 4 gloss lacquer coats on Saturday, Spray 4 more lacquer coats on Monday, level sand lacquer and spray 4 more coats on Tuesday, spray 4 more coats Wednesday and glue bridge on near the end of the day, and lastly make nut and saddle on Thursday by 3. I can do it. Fun stuff. Lots of stress.
Considering there was nothing to do on the acoustic tonight, I decided to get some work done on the notacaster. After much deliberation, I decided that I was going to do diamonds on the entire fretboard so things would look uniform and not as if I screwed up, so tonights order of business was to cut out more gold mother-of-pearl diamonds and inlay them into the fingerboard. I used a jeweler's saw and a handy dandy inlay cutting jig I made to cut out the pearl. Then I located on the fingerboard where they would be placed and traced the outline of each diamond. With the outlines drawn, I used the dremel tool with a precision router base to route out the fingerboard. Then, it was just a matter of mixing up some dark mission brown with epoxy, and epoxying the diamonds in place. I'll have to sand all the excess epoxy off on Friday to see how everything turned out, but I'm pretty sure that the diamonds will look awesome!
Here is the fingerboard after having the cavities for the diamonds routed out. You can also see all the diamonds that I cut out behind it, as well as the precision router base with the dremel in the upper left hand corner:

And after epoxying the diamonds in: The fingerboard looks really messy now, but it's a good idea to really pack the epoxy in so there will be no gaps.
And here is a shot of the body with the control cavity cover that I made by laminating 3 thin pieces of the top wood: It's not a perfect grain match because that would be impossible considering the pieces were cut from a different plane of the wood, but it's pretty close and I think it turned out really well.
That's all I have for tonight, but I'll try to post pictures of the acoustic finishing process and archtop tomorrow or Friday.
Well I guess I'm not, but I sure as heck am stressed out. After a couple of days of sanding, the acoustic is finally ready to start being sprayed! I was hoping to get the sealer coat on today so I could grain fill the first thing tomorrow morning, but that didn't happen. The good news is that there's no more sanding! This leaves me with the following needing to get done at the specified times: Spray sealer and apply grain filler tomorrow, sand grain filler friday night and maybe saturday morning, spray another sealer coat and 4 gloss lacquer coats on Saturday, Spray 4 more lacquer coats on Monday, level sand lacquer and spray 4 more coats on Tuesday, spray 4 more coats Wednesday and glue bridge on near the end of the day, and lastly make nut and saddle on Thursday by 3. I can do it. Fun stuff. Lots of stress.
Considering there was nothing to do on the acoustic tonight, I decided to get some work done on the notacaster. After much deliberation, I decided that I was going to do diamonds on the entire fretboard so things would look uniform and not as if I screwed up, so tonights order of business was to cut out more gold mother-of-pearl diamonds and inlay them into the fingerboard. I used a jeweler's saw and a handy dandy inlay cutting jig I made to cut out the pearl. Then I located on the fingerboard where they would be placed and traced the outline of each diamond. With the outlines drawn, I used the dremel tool with a precision router base to route out the fingerboard. Then, it was just a matter of mixing up some dark mission brown with epoxy, and epoxying the diamonds in place. I'll have to sand all the excess epoxy off on Friday to see how everything turned out, but I'm pretty sure that the diamonds will look awesome!
Here is the fingerboard after having the cavities for the diamonds routed out. You can also see all the diamonds that I cut out behind it, as well as the precision router base with the dremel in the upper left hand corner:

And after epoxying the diamonds in:
 The fingerboard looks really messy now, but it's a good idea to really pack the epoxy in so there will be no gaps.
And here is a shot of the body with the control cavity cover that I made by laminating 3 thin pieces of the top wood:
 It's not a perfect grain match because that would be impossible considering the pieces were cut from a different plane of the wood, but it's pretty close and I think it turned out really well.
That's all I have for tonight, but I'll try to post pictures of the acoustic finishing process and archtop tomorrow or Friday.
Tuesday, April 29, 2008
Not quite living up to the title of the blog.
It's been a rough couple of days, and I have a feeling it's going to get worse. I have more sanding to do in the next couple of days than I've ever done in my entire life. It's pretty ridiculous.
Friday was a fairly good day in electric construction, and a lot of last minute pre-finishing stuff got done or started. I routed my battery box hole, the tremolo spring cavity cover recess route, and spent a good deal of time the wood control mounting plate. I'm pretty happy with how it turned out and I was able to get the grain lines and figure to line up fairly nice. I also rasped out a little arm contour and started sanding the body out before doing the round-over on the body edges. I just have some fretwork, sanding, and round-over routing to do and the electric will be ready to get a finish at the end of May. I'm pretty excited.
The acoustic and archtop are not coming along as well. We had open lab time on Saturday and being that punctuality was not mandatory, I decided to go in to school an hour late to recover some sleep from being up fairly late on Friday. Needless to say, this set the lazy tone for the day and I didn't get a whole lot done. One of the problems the acoustic had before receiving frets is that the fingerboard was not securely glued in first position area and so I set about fixing this on Saturday by using a feeler gauge to work some thinned out hide glue into the loose area and clamp it down. This went pretty smoothly, except for the fact that there was a little rust on my feeler gauge which contaminated the hide glue. To make a long story short, my fingerboard came almost completely unglued when I was hammering frets in yesterday and I became a bit lugubrious at this point. I did, however spend some time on inlay on saturday also and inlaid an awesome little anchor into my headstock. I've gotten quite a few compliments on it from my classmates and I'm really happy with how it turned out. The guitar is, after all, a dreadnought body style, which is also the name of a British gunship from the early 1900s so I felt an anchor was rather fitting.
This is the gold mother-of-pearl anchor:

Today, my first and only order of business was to re-glue the fingerboard on to the dreadnought. This may sound like a simple operation, but I assure you it was anything but. First of all, I had to heat up the other half of the fingerboard that did not pop off yesterday and use a fingerboard removal knife to pry it off. This was a fairly easy job, since I used hide glue to glue the fingerboard on the first time. I decided that this time around I would put the frets in before gluing the fingerboard so I could use the arbor fret press. I had some chip-out from pulling the frets that I had originally pounded in that I had to fix , and touched up the radius of the fingerboard a little as well. Next, I had to rig up some clamping cauls. Since the neck had already been shaped, I no longer had a flat surface to clamp to and figured out a way to make a neck cradle work as a clamping caul with a little help from some cork. Also, since the frets were in I had to make notched cauls to spread the clamping pressure directly on to the fingerboard instead of the frets. Once these were made, I did some dry clamping and discovered that my fingerboard had somehow developed a round on the bottom surface that gets glued to the neck. It is crucial that the bottom of the fingerboard is flat for a good glue joint to the neck. Perhaps this is one of the reasons it failed in the first place. After a decent amount of time spent re-flattening the bottom of the fingerboard, it was finally ready to go after a dry clamping showed very minimal gapping. From what glue squeeze-out I have cleaned up so far, it looks like the fingerboard is on much better this time. I also used tite-bond because I feel more confident with it and it's longer working time, but that's an issue that many luthiers will have something to say about...
Here's a shot of the guitar with the fingerboard back on and all the frets except for the 1st and 14th in:

Friday, April 18, 2008
Another week, another blog, and they're getting closer.
I've been pretty busy lately and it's getting to the point where I sometimes have difficulty hearing myself think. Today was another productive friday. I laid out my pickup locations first thing this morning and got routing. Everything went smoothly there and I was done in little over an hour. The more efficient I get at routing, the more I really enjoy it. After the pickup routes were done, I did some planning of how the control cavity and control cavity cover is going to work out. I had already drawn things out on my blueprint, but there were just a couple of minor details that I wanted to work out.
I decided that I should make the cover before routing the ledge in the control cavity that the cover will attach to. As I am making the cover out of wood to match the grain and figure of the top, I had to laminate 3 pieces of very thin wood together, with the center piece having the grain 90 degrees to the grain of the other two pieces to add stability. I got this glued up and will unclamp it after the weekend. I hope it turns out well!
I also routed the control cavity and output jack location. After this was done, I realized that there were just a few more things left to route, 2 of which I never made templates for. I thought I was done making templates for this guitar! I guess not. I spent an hour or two making a template for the battery box and the spring cavity cover recess route. The spring cavity recess route will make the spring cavity cover flush with the body and I won't have it degrading the guitar by sticking out and making it uncomfortable to play. The battery box will stick out a tiny bit, but will not be uncomfortable because it will be close to the tail edge of the back of the guitar.
Here is a shot of today's progress routing the body:

And the control cavity cover wood being laminated. I used lots of clamps on this one, so let's hope that I got them on and cranked down in time... You can also see the template for the spring cavity cover recess route clamped up int the background.
I have been diligently chopping away at the archtop, but the process seems to be going even more slowly as I find myself working on it nearly every night. I got my f-holes cut last thursday and finally finished the graduations last night. The project for this weekend is to get the f-holes cleaned up so I can start fitting the braces on Tuesday and hopefully get them done quickly using Benedetto's carbon paper fitting method.
Here's the top with the f-holes rough cut by hand with a coping saw:

I'm really excited to see the archtop start taking shape, but I'm also starting to get worried that it may not get done by mid-may in order to get a finish on it, but I'm going to keep moving forward. I do have a week break after graduation before the advanced finishing class starts, so who knows, I could get it done...
I decided that I should make the cover before routing the ledge in the control cavity that the cover will attach to. As I am making the cover out of wood to match the grain and figure of the top, I had to laminate 3 pieces of very thin wood together, with the center piece having the grain 90 degrees to the grain of the other two pieces to add stability. I got this glued up and will unclamp it after the weekend. I hope it turns out well!
I also routed the control cavity and output jack location. After this was done, I realized that there were just a few more things left to route, 2 of which I never made templates for. I thought I was done making templates for this guitar! I guess not. I spent an hour or two making a template for the battery box and the spring cavity cover recess route. The spring cavity recess route will make the spring cavity cover flush with the body and I won't have it degrading the guitar by sticking out and making it uncomfortable to play. The battery box will stick out a tiny bit, but will not be uncomfortable because it will be close to the tail edge of the back of the guitar.
Here is a shot of today's progress routing the body:

And the control cavity cover wood being laminated. I used lots of clamps on this one, so let's hope that I got them on and cranked down in time...
 You can also see the template for the spring cavity cover recess route clamped up int the background.
I have been diligently chopping away at the archtop, but the process seems to be going even more slowly as I find myself working on it nearly every night. I got my f-holes cut last thursday and finally finished the graduations last night. The project for this weekend is to get the f-holes cleaned up so I can start fitting the braces on Tuesday and hopefully get them done quickly using Benedetto's carbon paper fitting method.
Here's the top with the f-holes rough cut by hand with a coping saw:

I'm really excited to see the archtop start taking shape, but I'm also starting to get worried that it may not get done by mid-may in order to get a finish on it, but I'm going to keep moving forward. I do have a week break after graduation before the advanced finishing class starts, so who knows, I could get it done...
Friday, April 11, 2008
Routing fun.
I realize that I haven't blogged in a couple weeks, but that's because I haven't been doing a whole lot in the area of guitar building. I've been working diligently in archtop to try and get things done, and I'll be done with graduations soon. I'm still not sure if it's going to get finished by the end of the school year, but I sure as heck am going to try.
I made some great progress on the electric today, so I'm in a pretty good mood about that. I also spent most of the day on Wednesday working on the archtop and electric because we didn't have class due to a faculty in-service day, whatever that is. Remember how I was irritated that I drilled my fretboard position dots crooked and they looked really horrible? I did some brainstorming and decided that I was going to inlay diamonds over, so on Wednesday I cut some diamonds out of gold mother of pearl and just have to route the inlays into the fingerboard and epoxy them in.
First item of business this morning was to do a neck pocket test route. I had already made a neck pocket template, so it was now a matter of making sure it would work on the real thing. I did my test route as quickly as possible and it went nearly perfect, so I decided to do the real thing and had no problems.
Next Item of business was to drill the neck mounting holes through the body and into the neck. The holes through the body are bigger than the screws so they can slip right through. This allows you to pull the neck snugly into the neck pocket without the screws getting caught up in the holes in the body.
After measuring things a couple of times, I marked out the bridge location and drilled the holes for the bushing posts that the floating bridge sits up against. I then located where the tremolo block cavity would go and routed that, flipped the guitar around, and routed the spring cavity and remainder of the block cavity.
Here's the guitar body with the neck pocket routed, and bridge post holes drilled and tremelo block cavity routed:

And a shot with the neck and bridge in place also showing the diamonds that I cut out to cover up my drilling mistake. All thats left is frets, electronic routing, a little body carving and rounding, and a finish, which will be done the last 2 weeks in May:
This shows the rear spring cavity and block cavity routes with some wire channels showing through:
I made some great progress on the electric today, so I'm in a pretty good mood about that. I also spent most of the day on Wednesday working on the archtop and electric because we didn't have class due to a faculty in-service day, whatever that is. Remember how I was irritated that I drilled my fretboard position dots crooked and they looked really horrible? I did some brainstorming and decided that I was going to inlay diamonds over, so on Wednesday I cut some diamonds out of gold mother of pearl and just have to route the inlays into the fingerboard and epoxy them in.
First item of business this morning was to do a neck pocket test route. I had already made a neck pocket template, so it was now a matter of making sure it would work on the real thing. I did my test route as quickly as possible and it went nearly perfect, so I decided to do the real thing and had no problems.
Next Item of business was to drill the neck mounting holes through the body and into the neck. The holes through the body are bigger than the screws so they can slip right through. This allows you to pull the neck snugly into the neck pocket without the screws getting caught up in the holes in the body.
After measuring things a couple of times, I marked out the bridge location and drilled the holes for the bushing posts that the floating bridge sits up against. I then located where the tremolo block cavity would go and routed that, flipped the guitar around, and routed the spring cavity and remainder of the block cavity.
Here's the guitar body with the neck pocket routed, and bridge post holes drilled and tremelo block cavity routed:

And a shot with the neck and bridge in place also showing the diamonds that I cut out to cover up my drilling mistake. All thats left is frets, electronic routing, a little body carving and rounding, and a finish, which will be done the last 2 weeks in May:

This shows the rear spring cavity and block cavity routes with some wire channels showing through:

Friday, March 28, 2008
A different method of neck shaping
Friday was a fairly productive day of work on the electric. My instructor and I had decided that it would be a better idea to shape the neck before fretting, due to the fact that no amount of force on the truss rod would straighten the neck. Perhaps if the neck was carved and excess material removed, the neck would be more flexible and able to get out of the back bow. Why is this a big deal? In order to level the frets, the fingerboard needs to be straightened. It is possible to sand the fingerboard straight with the backbow, but it is a lot of work.
Before starting to carve the neck, I laid out the tuner hole spacing, drilled, then reamed the holes to fit the tuners. This went very well (much better than the fingerboard dots) and the tuners look awesome on the headstock. Here is what the look like:
Once I was satisfied with how the tuners fit, I started shaping the neck. In the electric class, we were taught a different method of neck shaping than we were taught in acoustic construction, so I decided to give this a shot. This involved rasping down to within 1/32" of the thickness of the neck at two points, in my case the 1st and 12th frets, establishing the round of the neck at these points, and rasping out everything else on the neck to blend everything all together nice and straight. Simple enough, but still time consuming. I even picked up a horse hoof rasp to make quick work of the rough shaping, but the refining took a lot longer.
Here are a couple shots of the neck nearly finished being shaped:


That's all I have for now. Maybe I'll start putting some pictures of my classmates instruments in progress up here as well. Here is a picture of the bass that my buddy Gomer is building. It is a set neck, with a massive chambered body. It should be pretty sweet.

Before starting to carve the neck, I laid out the tuner hole spacing, drilled, then reamed the holes to fit the tuners. This went very well (much better than the fingerboard dots) and the tuners look awesome on the headstock. Here is what the look like:

Once I was satisfied with how the tuners fit, I started shaping the neck. In the electric class, we were taught a different method of neck shaping than we were taught in acoustic construction, so I decided to give this a shot. This involved rasping down to within 1/32" of the thickness of the neck at two points, in my case the 1st and 12th frets, establishing the round of the neck at these points, and rasping out everything else on the neck to blend everything all together nice and straight. Simple enough, but still time consuming. I even picked up a horse hoof rasp to make quick work of the rough shaping, but the refining took a lot longer.
Here are a couple shots of the neck nearly finished being shaped:


That's all I have for now. Maybe I'll start putting some pictures of my classmates instruments in progress up here as well. Here is a picture of the bass that my buddy Gomer is building. It is a set neck, with a massive chambered body. It should be pretty sweet.

Thursday, March 27, 2008
Rough Graduations Progress
Well, tonight was another fairly productive session of archtop carving. I got the bulk of the inner arch carved in the top and then switched to the flap sander to smooth things out. I then set up the back in the cradle and sanded it as well to lessen the amount of hand tool work that would be needed.
Here are a few pictures with me actually in them, carving the top with the angle grinder:

 Thanks to Gomer for being the guest photographer tonight.
After I had gone as far as I dare with the grinder, I clamped the cradle to my bench and started fingerplaning away. The idea is to fingerplane and scrape until all the holes that were drilled previously are gone and you then end up at the desired thickness, in this case 6 mm for the rough graduations. I got a good deal of this done on the back and hope to have the rough graduations on both the top and the back done on tuesday.
Below is a photo of the back rough graduations and you can see how some the holes that were previously drilled are now gone. I was surprised at how accurate I was able to get this, as the areas where the holes are gone are now at 6.2 mm, so only 2 tenths of a millimeter away from the 6 that I was shooting for.
 There is definitely still some work to be done here, but it is coming along nicely. I might even be able to rough cut the f-holes on Tuesday! Well tomorrow is electric, so I'll probably post another blog shortly after, but that's all I have for now.
Here are a few pictures with me actually in them, carving the top with the angle grinder:


 Thanks to Gomer for being the guest photographer tonight.
After I had gone as far as I dare with the grinder, I clamped the cradle to my bench and started fingerplaning away. The idea is to fingerplane and scrape until all the holes that were drilled previously are gone and you then end up at the desired thickness, in this case 6 mm for the rough graduations. I got a good deal of this done on the back and hope to have the rough graduations on both the top and the back done on tuesday.
Below is a photo of the back rough graduations and you can see how some the holes that were previously drilled are now gone. I was surprised at how accurate I was able to get this, as the areas where the holes are gone are now at 6.2 mm, so only 2 tenths of a millimeter away from the 6 that I was shooting for.
 There is definitely still some work to be done here, but it is coming along nicely. I might even be able to rough cut the f-holes on Tuesday! Well tomorrow is electric, so I'll probably post another blog shortly after, but that's all I have for now.
Subscribe to:
Posts (Atom)