Here is the guitar when I took it in:


This guitar was in pretty rough shape when I got it on my bench and the action made it pretty much un-playable. The average saddle height for a measurement taken at the 12th fret on the low E string should be .09" and as you can see in the photo below, this one is over .140", way too high for anybody to play. I realize the picture shows the height at the 11th fret, but the photo was taken for illustration purposes.

The photo below shows the neck extension height. The straightedge should be even with the top of the bridge, but was about 1/16" low, a problem which will be corrected with new frets and planing down the bridge.

The first order of business was a re-fret and fingerboard repairs. The old frets had some serious divots in them at the first position, as did the fingerboard itself. Using my trusty soldering iron and fret pullers, I carefully removed the frets so i could work on the fingerboard. I used some rosewood dust and super glue to fil the fretboard divots and re-sanded the radius into the fingerboard as well as straightening it lengthwise. When it was ready for new frets, I radiused and rough cut the frets to length. Because the fingerboard was bound, the tangs needed to be cut off the ends of the frets so they would fit in the slots. Then the fret slots were cleaned and the edges of the slots were filed to allow the frets to seat properly. Despite my efforts, I didn't have a lot of luck with the frets seating properly and had a lot of fret end gluing to do. This was quite frustrating and makes me really think it is worth investing in a fretwire bender and a set of fret presses. It's too bad they are so ridiculously expensive, so maybe if I get ambitious one of these days I'll work on making my own. Re-frets are a tedious job, so I'll fast forward a bit so as not to bore you... The frets were then beveled, leveled, crowned, sanded, and polished to make the guitar play great and ensure that the frets don't buzz, a process that takes at least another 2 hours or so. I know that the guitar will now play much better than it ever did.
The frets, fingerboard and nut before starting work:

In the above picture, you can see how deep the divots in the frets and fingerboard were. They are now non-existant:

After the fret job was done, I could now tell how far the bridge needed to be taken down. The fret job took care of about 1/32", so the bridge needed to be planed down about another 1/32". The existing saddle was a steel drop-in adjustable piece with only 2 small points of actual down pressure on the bridge, definitely not an efficient way to transfer energy from the string vibrations to the top.

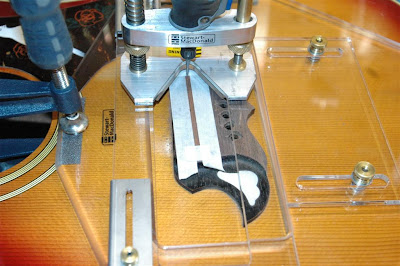
The customer told me to do whatever it needed, so I made the decision to plug the existing saddle slot with rosewood and re-route a new slot for a new bone saddle. The plug was fairly easy to fit, and once it was glued in, I planed the bridge down to a good neck extension height. After this was done, I measured and marked the saddle location and set up the saddle routing jig.
Here is the jig setup:


The saddle routing jig worked pretty well, aside from a minor technical difficulty with the router base. Before I started routing, I made sure that the height adjustment screws were tightened, but one screw started coming unscrewed after I started routing. I had to hold the screw to keep it from turning any further as I routed. Needless to say, the saddle slot wasn't as clean as I would have liked but I was still able to get a saddle to fit tightly in the slot.
Here is the finished product, with a stubborn pin that wouldn'tstay down on the low e string. The pins were in pretty rough shape and I recommended that the customer buy a new set for the guitar.

The last step was making a new nut, as the previous nut was a joke. It was held in with rubber cement and had a plexiglass riser underneath because the nut slots were too deep. It felt really good to be finished with this job.
Here is the finished guitar:

Well, maybe not. Bubba thinks he's a guitar sometimes and loves to lay inside cases. I forgot to take any pictures of the actual finished product, but there are a couple of pictures of the finished work above. Hopefully I'll get some more repair jobs to blog about as it is still going to be a while until I'm able to build any more guitars.